Day Hacker: Techno Spaceship Ableton Project Breakdown
Posted by Alex Massaad on
This blog post will walk through some of the strategies used to record Techno Spaceship, the first track of Day Hacker’s Zero One EP. Day Hacker is an electronic music collective formed in 2016. The group started after an impromptu jam session at work. The recording kept going and by the end of the second day a short EP had been laid out.
While our focus is on Ableton Live and synth music these tips should be applicable to anyone recording any type of music on the computer. Recently the Day Hacker group (and some other musically inclined folks) started meeting up weekly to discuss the production and recording tips we've all collectively accumulated over the years.
Listen to a continuous mix of the album, Techno Spaceship is up first
Building up a track with a limited amount of time requires a laser-sharp focus regarding which tasks to do at any given point. You might begin by mixing and adding compression to your tracks immediately after recording. With an unlimited amount of time this might be an option but we had less than 48 hours to record all our songs. Techno Spaceship was recorded in under 3 hours including coffee/pizza/bathroom breaks!
Time management was key.
I'm going to explain how we recorded this track based on the earliest file save I was able to find. I tend to have over a dozen versions of each project saved from checkpoints. I don't have a hard and fast rule for making a checkpoint, but I usually “save-as” when I’m about to make major changes during the mix. When I add or remove a part I might want to undo at a later time I will save-as with an incremented file name as seen in this screenshot:
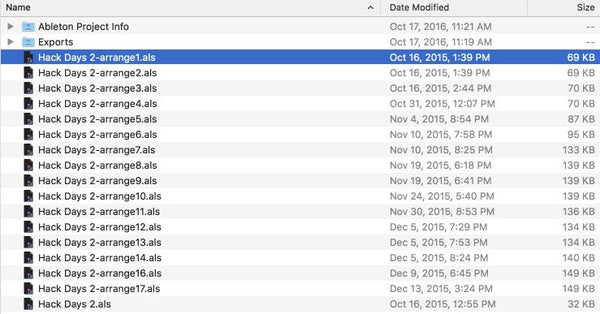
This is neat because now I can go back in time and see how long it took me to turn the basic jam elements back into a more complex and finished music track. We did the recording October 16 and by December 13th the main mixing and production was complete.
Recording Process
From what I can remember and see in the projects the main recording happened directly in Ableton using the session view. At the time I wasn't sure if we would be relying on external beats or trying to record each synth and drum machine separately. The trouble was, we didn't know we were going to take this recording format when we started.
We briefly jammed a few days before the recording sessions but I didn’t really plan any strategy to record the music. During the session we sampled and recorded each instrument individually after coming to a consensus about the song while jamming together.
We began playing around parts some of us had saved up. Then we started adding patches together in a harmonious way with the intention of recording them out separately. When the jamming started to get groovy we realized it was important to record the jams directly off the mixer as a starting place or guide track.
The recording took place directly in the session view.
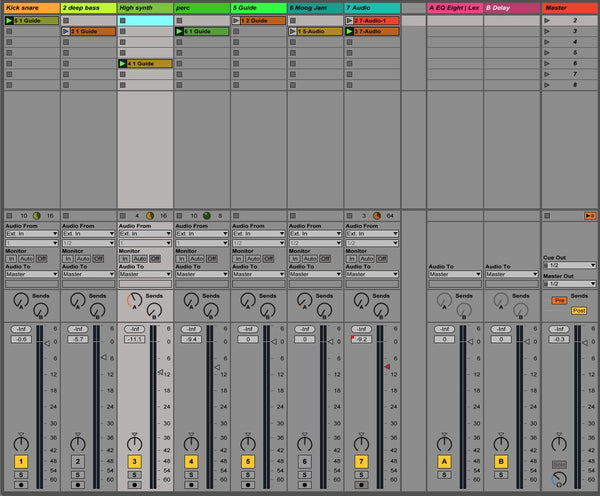
The screenshot above shows that 7 parts were used for the starting place of this project, but not all of them were audible. The 5th track (Guide) was silent and was the jam we recorded initially. This "original mix" was used to cue the separate band members for the required sample recording later and remind me of the initial intentions when I was mixing later. In this way we separately recorded this song's basic elements: the MPC samples (a kick and a perc part), some Korg Volca Keys, a Moog Sub 37 bass and an effects swell part.
Session View
The session view is Ableton Live’s confusing second side that many folks shy away from because it is a bit different and can seem difficult. I use it because it has some incredible strengths for working fast. Using Ableton's session view during the recording phase had two technical advantages.
First we were able to instantly audition each recording with the context of each relative part immediately after recording. Once we had drums recorded in and looped we could play other parts immediately to find more inspiration quickly. If a second take was required we could catch it right away without the hassle of laying out the track or doing any arrangement. It was also possible to add some basic effects and do some jamming against the recorded parts on playback.
The second great advantage was when it finally came time to settle on an arrangement I used the session view to “play out” an arrangement by recording the session clips as I launched them. This is similar to the way a DJ would use Ableton and maybe that's why it really is such a fun part of the production. If you’re not familiar check out this video that explains how the session view works:
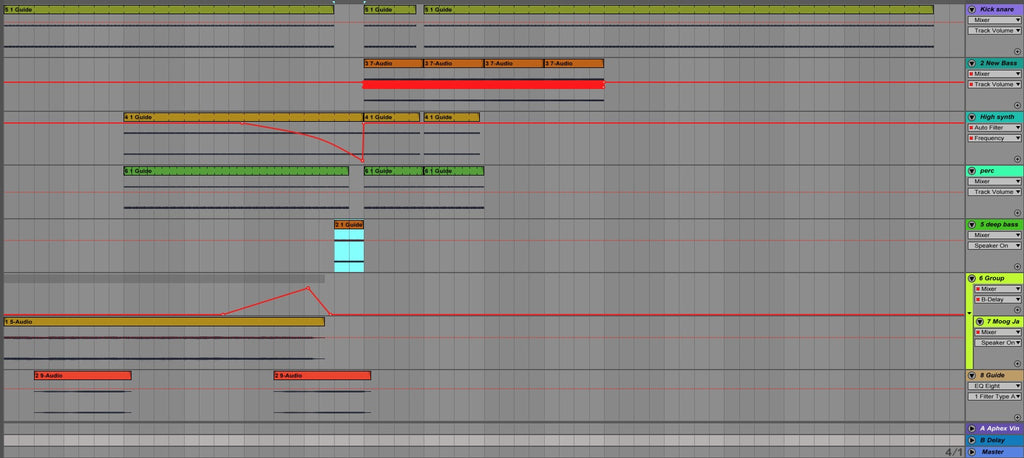
Rough First Draft
Time management restrictions forced a chaotic first arrangement. This was helpful because it allowed the basic elements to be recorded, then we were able to move on to recording the next tracks. A few weird things I can spot right away from the following screenshot are: the bass is split between tracks 2, 5 and 6, hardly any effects or automation exist and the structure appears to show a very lifeless build. Eck - It just builds and dies. Where to go from here?
The layout of this first arrangement was too simple and a bit boring. Here is the a screenshot:
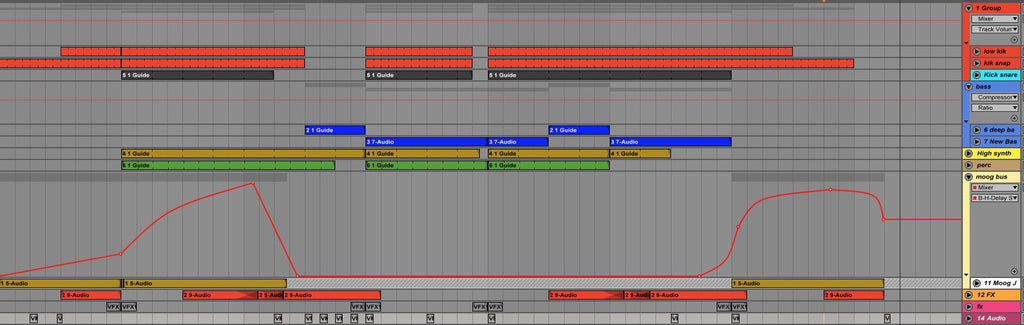
This spot can often be a stalling point in many musical projects because it almost seems to require recording more or new music. How can we inject more life into these loops? The missing sauce for Techno Spaceship will mostly be found in sound effect clips, automation and some minor arrangement tweaks. Here is the final arrangement
Filter and Delay
We love playing with effects and we spent a large portion of the jams just listening to our music repeating through a feedback delay or drooling over the sound of a Lexicon hall reverb. The only effects recording we made for this track was just one woosh effect which is featured in the first 30 seconds. To help the synth build I added a filter and delay which were automated to swell at appropriate points in the arrangement. The filter was the Ableton Auto Filter and the Waves H-Delay.
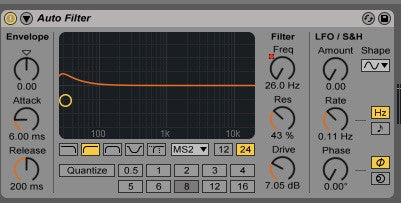
The Auto Filter is very helpful as a multi-purpose filter but I hardly ever use the automatic part of it. It should just be called “the filter”. A somewhat lesser-known setting to tweak is the filter type. By default the auto filter is set to clean - which is great for low-cpu consumption and boring filter sounds. Some of the other types replicate various synths, including the PRD which replicates the classic moog ladder filter circuitry.
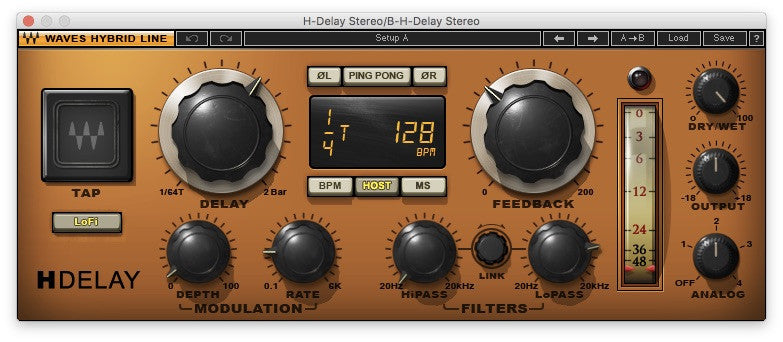
The H-Delay adds an analog feel to the synth lines with a crunchy, distorted tape delay that feeds back over itself as the filter expands. The final analog spice over the mix is the Aphex Vintage Aural Exciter which according to Waves adds: “presence, brightness, and vibrancy on vocal and instrumental tracks.” I ran this effect into a bass-cutting EQ and finally through a reverb to add a treble-heavy sheen to any instruments piped through the exciter/reverb bus. I’m a fan of a chain that looks like: bass cut -> distortion/alteration -> reverb to create a light effect bus to glue the track together.
Perfecting the Mix
The final steps after mixing (but before mastering) are exporting the track repeatedly and listening to it on multiple systems. I also listen through earbuds and headphones and make notes about what to change when I’m in the studio next time. Ideally a track will sound the same in any environment. When most of the mixing has finished I try to achieve this stability. Only once the mix is solid should you begin to make the specific elements more bold.
How do you make a track bold?
It is easy with the right elements. I think a trustworthy set of audio monitors are the first essential ingredient you must have. I guess ears are a requirement too, but after that everything else falls into place. I call my speakers my “audio microscope” because details just jump out that can’t be heard on other speakers in other rooms. I only added mix elements and effects once I was in my trusted space.
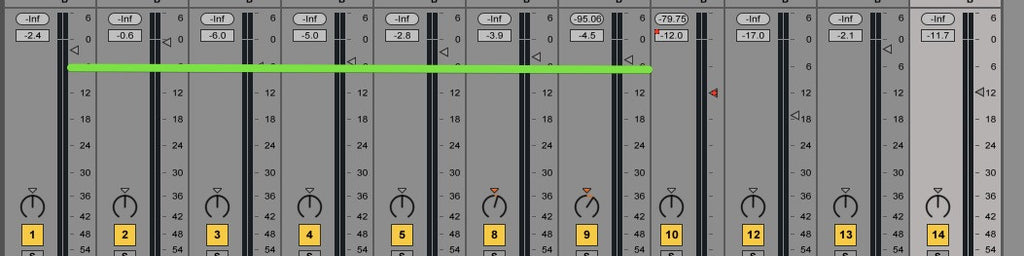
These tracks each have EQ/filter, some of the tracks have compression and/or limiting and they were all adjusted to have similar gain by the time it hits the Ableton Live mixer. Some of the recordings were quieter than ideal and on these low volume recordings I inserted a Utility plugin to boost the gain. Among other useful functions this allows gain adjustment before effects and before the mixer sliders while being able to bypass the effect temporarily. Having similar levels to start means I don’t need to do drastic level adjustments with the mixer. All of my main instruments are above -6 in the final mix in this screenshot:
In the last stages I do throw some kind of mastering plugin or limiter (L1 or Ozone) on the master channel - but this is for export only. We don’t listen in studio to this version since it can colour the aural perceptions a little too early - it fixes parts of the song for you when you are still at a stage to fix them yourself. If you can’t hear the problem you won’t fix it.
Once the mastering chain was turned off the song was exported at 32-bit depth. To ensure nothing peaks it is vital to play the song back and monitor the maximum channel levels and the master meter to watch for any sounds above 0 dB. If anything is high make sure to lower the volume of everything at the same time evenly. In Live I use the Utility for gain on the master channel also and I would leave this active during export. The mastering process can easily bring the song back up to final levels without any extra noise so it's important to mix the song low enough so nothing will peak.
I hope you enjoyed finding out all the details from recording and mixing Techno Spaceship. If you have any questions feel free to get in touch via the comments below.
Share this post
- 0 comment
- Tags: Ableton, Day Hacker, Live